I will start with another digression. Please don't be discouraged from knitting your own socks because of my slow progress. At this stage in my life I need to stop to rest before I get tired and take breaks for a small meals before I get hungry. The other major rule is only doing one interesting thing a day, e.g. the trip yesterday to the grocery store. The official diagnosis from 1997 is Mitochondrial Myopathy, but the inability to produce energy effectively affects a lot more than walking.
The most discouraging part is that each time I develop or modify a coping strategy, it is a temporary victory until another manifestation appears to counter it. Until about a year ago, weather permitting, I was able to use a rolling walker to board the county bus, navigate through the locker room, and work out in the swimming pool at the YMCA. This was great because I could do aerobic exercise and stretch without having to worry about falling down and without putting weight on the arthritic joints. Then I developed a frozen shoulder, fairly common in people my age who have metabolic problems. There was pain and loss of range of motion. Instead of being able to choose between using the electric scooter or the walker, I had to use the scooter and a lot less frequently. I could no longer sleep on my left side and had alter many other habits, like the way I had been dressing myself since I was a small child.
The best coping strategy seems to be developing an efficient method of mourning losses, then focusing on using what is left effectively. Even though I can't do as much knitting or crocheting at a time as I used to do, they are a welcome diversion when I lie down to take breaks. Often counting stitches is relaxing and brings on a nap.
Knit fabric has stretch due both to using wool yarn (elastic fiber and structure) and the shape of the stitches. The strength of the knitting lies in how individual stitches distribute tension across their neighbors. The challenge is now to take a rectangular piece and curve it. This is accomplished by continuing to knit across and purl back using short rows. If you look through knitting patterns, you will discover there are two main ways of doing this.
To make a German heel, divide the heel flap into sections consisting of 1/3 of the stitches each. If your stitches aren't evenly divisible by three, put the extras in the middle section and put stitch markers between the sections if it helps. You knit across the first two sections, knit the last stitch with the first stitch of the next section (a decrease) then turn and purl across the center section and purl the last stitch with the first stitch of the next section, then turn and knit continuing the decreasing until all the stitches in the end sections are used up.
The conventional heel differs in that you knit to the center of the heel flap, decrease, then knit one stitch, turn, purl 2, decrease in purl, then purl one before turning. The decreases are made over the "hole" formed from making the turns until your reach the vertical edge.
I like the shape of the German heel, especially when working with a large number of stitches in fine yarn, as the conventional heel can come out a bit too pointy for my taste. However, the conventional heel is reputed to wear better. So, I usually do something half way between the two. I divide the stitches into thirds and knit across to within three stitches of the "left" third, then knit two together (actually SSK) and knit 1 and turn, then purl to within three stitches of the "right" third, then purl two together, purl one, and turn continuing until the stitches on the left and right sections are consumed in the decreases.
All idealogy aside, what counts is:
Some people join in a nylon "carry along" thread to strengthen the heel and toes. I have found that can prevent a gaping hole from forming. The sock will still provide warmth, but the loss of the wool fibers results in little or no cushioning where it is most needed. A better way to prolong the life of the sock is when the pressure points start to become thin, snip a thread where the heel flap starts, unravel back a row or two, then pick up stitches and knit the entire foot again using yarn left from the project or new yarn of similar weight. It is OK to use several colors to use up odds and ends, just be sure to weave in the ends at joins instead of making knots.
I would make sure to have at least two pairs of unworn socks or recently repaired socks (where the whole foot was replaced) before starting an extended trek.
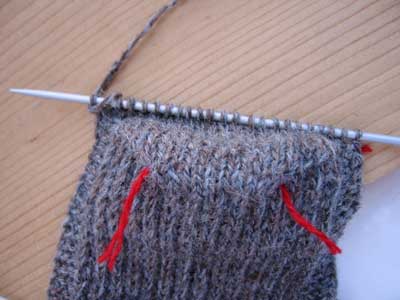
I insert a snippet of red yarn as a marker between the 12th and 13th stitches and another between the 24th and 25th stitches. It is sunny today, so I can see the stitches clearly, even though this yarn is rather dark. Taking my time, this takes some concentration, and being careful to avoid splitting stitches while working the decreases, I start to turn the heel. On the right side (outside of sock):
Slip the first stitch as if to purl
Knit 20 stitches
SSK (left pointing decrease) and knit 1
Turn
Slip one stitch purl wise
Purl across to within three stitches of the marker
Purl two stitches together, then purl 1
Turn
Slip one stitch knit wise
Knit across to within 1 stitch of the turn
SSK and knit 1
Turn
Slip one stitch purl wise
Purl across to one stitch of the turn
Purl two stitches together, then purl 1
Turn
Continue this way until the "edge" stitches are used up.
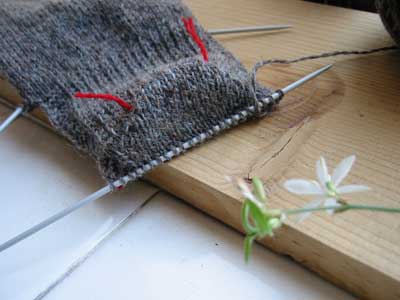
The sun is out again, so I can take closeup photos by my window of the first sock at the point of purling back on the last row.
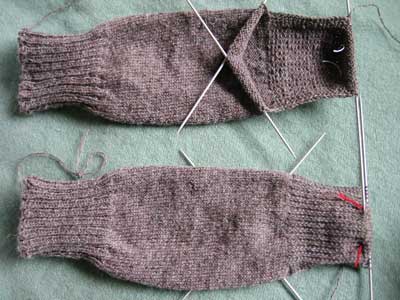
I will turn the heel for the second sock while the memory is fresh.
There were 22 stitches on the heel flap needle. The other two needles still held the 18 stitches each I left on them May 22 to start the heel flap. With the right side of the heel flap facing me, I slipped the first stitch, knit the next 10 stitches, put a thread in to mark the middle, then knit the next 11 stitches.
Next I picked up and knit 19 stitches in the slipped stitch selvage onto a new needle. This is 18 stitches for the garter stitch ridges and one stitch for the last heel turning row. Here it is legit to pick up both threads or just the outer thread of the chain edge. If you knit the garter stitches without slipping the first stitch, pick up one stitch on each bump of a ridge.
This brings the work to the next needle and the stitches for the top of the foot. Here you need to be careful not to leave a gap. This also happens where you join on the thumb on mittens and the fingers on gloves, or if you join on sleeves to the body in an Elizabeth Zimmerman percentage system circular knit sweater. There are several ways to deal with it:
I chose the second option, then knit across the next needle and continued knitting off the next needle to put 36 stitches onto one needle.
This brings me to the second heel flap edge, where I take precautions to avoid a gap and pick up and knit 19 stitches onto a third needle. Using the same needle, I knit 11 stitches, half of what was on the heel flap needle.
This shifts the needles, with 30 stitches on two needles for the bottom and side gusset of the sock and 36 stitches for the top of the foot for a total of 96 stitches around. I like to knit two full rounds after picking up the gusset stitches to allow things to ease out. I knit a second round, then knit half way through a third round, leaving the top of foot stitches split between two needles so that I can lay the sock flat and scan it.
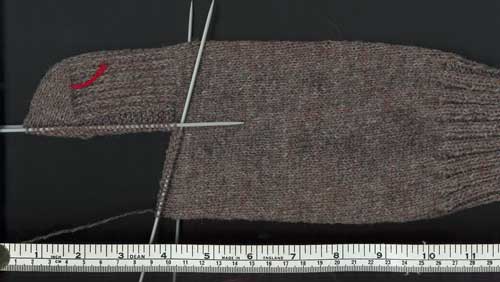
After doing the same to the second sock, I will start decreasing at the upper side of the two gusset needles (parallel to the tape measure in the scan) just to the left of where you see the 90° corner to take up the slack and taper the bore of the sock. This will take a while, there are a lot of stitches around, so tomorrow I will alternate between the two socks until there are 18 stitches left on each of the side needles.
When picking up the stitches on the heel flap edges, go for an even, smooth look. If you achieve this but there is one stitch difference, continue and just make one more round with a single decrease on the more well endowed side. Unless you have two different sized feet, try to get to within one stitch of having the same number of stitches around before starting the gusset decreases.