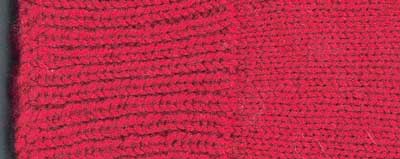
Ribbing and Stockinette
Cast on 20 stitches and then turn and Knit I, Purl 1 (k1, p1) back. Turn and knit the knit stitchs and purl the purl stitches. (If you make a mistake and knit the purl stitches and purl the knit stitches, you are doing Moss Stitch which is beautiful and also a good edging!) Work the ribbing for about two inches then change to stockinette -- Knit across and purl back. Work about two more inches this way and cast off.
Variations
Ribbing is good for a border on sleeves and the bottom of sweaters, gloves, mittens, socks, etc. because it lays flat, will gather in a bit, and both sides are the same so you can turn up a cuff. If you like a tighter edge or a gathered effect, knit the ribbing on needIes 2 or more sizes smaller than you use for stockinette. Alternatively (or also) cast on about 10% less stitches and work the ribbing. When you change to stockinette, increase evenly across the first row.
Increasing -- Practice on a stockinette swatch.
Yarn over leaves a hole, nice for a lacy effect. Make one is practically invisible, and knitting into the front and back shows as small horizontal line across the stitch.
Decreasing -- Practice on a stockinette swatch.
Casting on
Corded edge
Make a slip knot as in simple cast on then insert the right needle into the Ioop and pull out a new loop and place over the left needle. *insert right needle between the two loops, draw out a new loop and place over left needle* repeat between stars (*).
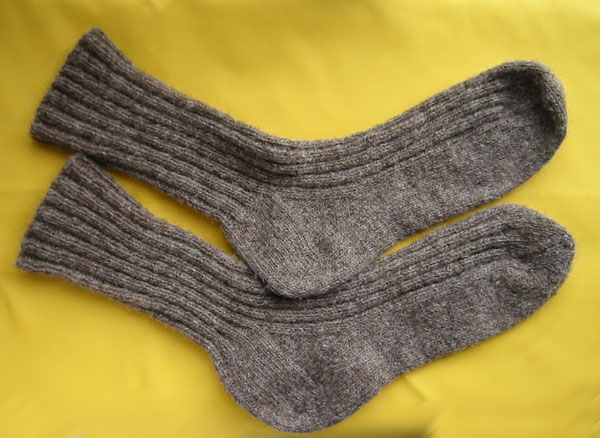
Cast on for sock needles
Cast on the number of stitches required on a long needle or a sock needle if it is long enough. Make sure the casting on is loose to allow for stretch. Long tail cast on or corded edge are easier to handle.
[Now, 2004, I usually cast on a straight needle that is at least two sizes bigger than the sock needles or on two sock needles held together. The ribbing will look really ugly and loose at first, but somewhere between one and two inches, it will magically pull together.]
Divide the number of stitches by 3 and knit (or start ribbing) onto the first sock needle. Knit the second 1/3 of your stitches onto the second needle, letting the first needle hang free. Knit the last 1/3 of the stitches on the third needIe.
Next join the ends together. Make sure your work isn't twisted (you don't want a Möbius strip) and then start working the stitches from needle #1 onto needIe #4. Continue to work around taking care to knit the end stitches tight so there isn't a mark where you change needIes.
Weaving Stitches (also called Kitchener Stitch or grafting)
Place stitches on two double point needles and make sure that each has the same number of stitches. Break off the end of the yarn leaving a long tail to thread through a tapestry needle. * insert tapestry needle as if to knit in the first stitch on the front needIe, draw the yarn through and slip off the needle. Draw thread through the next stitch on the front needIe purIwise and leave it on the double point needle, insert needle as if to pur1 in the first stitch on the back needle and slip off the double point needle, draw thread through the next stitch on the back needle as if to knit and let on the back double point needle * repeat between *'s. Work slowly until you get the rhythm: knit, slip, purl, purl, slip, knit; if your stitches are too loose, adjust the tension after all the stitches are woven.
Bind in the end of the yarn to finish.
These are very sketchy directions, the students are encouraged to get a pattern from the public library or an inexpensive leaflet (example "On your Toes!" Book No. 218 from Bernat, 75¢ for socks) or one of the standard knitting books. Look for Four needle or sock needle sock and mitten patterns.
Cast on enough stitches to reach snugly around the ankle and instep of the foot (choose a multiple of 4 stitches).
For stockings cast on the calf measurement, work 1/3 of the length of the shin bone straight, decrease to the ankle measurement over the next 1/3, then knit 1/3 in ankle stitches.
Work at least one inch in a ribbing stitch then continue in ribbing or switch to stockinette and work to the ankle.
[I was an avid cross country skier in those days, so I frequently made knicker socks (over the knee length).]
For the heel put 1/2 your stitches onto one needlle. Knit the first three stitches and the last three stitches and in the middle knit 1 slip 1 across. Purl back keeping the three edge stitches in garter stitch. Work even until there are as many garter ridges as your heel stitches divided by 2 (1/4 of the ankle stitches. On the right side, knit half way across then SSK, k 1, turn. Purl 2, purl 2 together, purl and turn. Knit 4, SSK, K1, turn. Purl 6, P2 tog, P1, turn. Continue this way decreasing over the gap left by turning until your decreases reach the edge of the heel. End on a knit row, then shape the ankle by picking up and knitting one stitch from each garter ridge on the side of the heel flap. Next knit across the front stitches, then pick up and knit one stitch per ridge on the remaining side of the heel flap. Distribute your stitches on the needles so that the front stitches are on needle #1, the picked up stitches and 1/2 the hee1 flap stitches are on needle #2, and the #3 needIe has the remaining 1/2 of the heel stitches and picked up stitches.
Now knit around and decrease every second or third row by doing SSK on the right side of needle #2 and K2 tog on the left side of needle #3. When you have decreased back to the number af ankle stitches, knit around until you reach the joint of the big toe (bunion) and decrease every second row four times at either side of the foot.
Finish by weaving the toe.
[Now I usually have the recipient stand on a piece of paper in bare feet or thin socks and a second person trace the outline of their foot. Meaure the width at the center of the foot and use this measurement times 2 and times your stitch gauge for the ankle/instep stitch count. For adults, I make notes on the tracing and save these for making the next pair of socks. For children, save them to see how much they grow!]
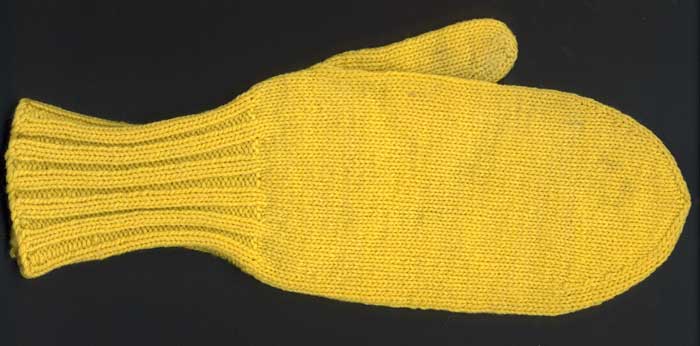

Cast on enough stitches to reach comfortably around the hand in stockinette. Multiples of 4 works well. Rib for two to four inches (even longer if you wish) with the stitches distributed evenly over the three needles. Next knit 1 inch around in stockinette. Make the thumb gusset by marking the first and sixth stitches on the first needle and increasing in these stitches every second round until you have a 16% increase. (If you start with 48 stitches increase until you have 56).
Next knit about 1/2 inch without increasing. For the thumb, take off the gusset stitches onto a thread or scrap of yarn and cast on enough stitches over the hole to make the same number of stitches you started with. Knit around until the hand is long enough to reach the first joint of the index finger, then decrease as in the toe of a sock and weave the edges closed.
Thumb: Take up the stitches on the yarn with two needles and pick up and knit the cast on stitches. Work one round then decrease 1 stitch in the center of the cast on stitches. Decrease at the same point every fifth round three more times (four decreases total) . When thumb is about 2 inchs long, narrow by decreasing at the end of each needle until half of the stitches remain, then weave together as in the toe of a sock. Bind in all ends then make another one putting the thumb on the other side for a pair.
[Making a tracing of the recipient's hand helps for shaping as for socks above.]
To make them the same when you need a pair, keep a note card or notebook with the stitch count ane number of rows as you work.
[I have accumulated two or three sets of sock needles in each size, so now I almost always split the yarn into two balls and cast on both members of the pair at once and alternate working on them.]
I like to make socks and mittens more tightly knit than sweaters, for example if you knit at four stitches per inch in stockinette, use smaller needles for a 5 stitch per inch gauge.
[I have been dealing with Wisconsin winters with a two mitten layering system. The inner/mild weather mittens are knit in fingering or light sport weight yarn. The outer mittens are made in knitting worsted or heavier, often shaggy wool.]
For children's mittens you may want to omit the thumb gusset and make three so that the child has a spare and doesn't need to find a Ieft and right.
Infants mittens are made without a thumb! Easier for mom and baby.
You can incorporate aran patterns or color patterns in mittens and in the cuff of a stocking, be sure to keep the sole of the sock in stockinette for comfort.